Friday, April 27, 2007

Tables from Office 2007 to BlogSpot – Part III

Back to result from my previous post here, and here, I'm disappointed from the results I get (Yeah, all of them). My first curious is because the table width are simply not dynamic. Let's try this again.

Table 1: Dynamic table with layout and auto fit content turned on

Code

Using lgb As
New LinearGradientBrush(Me.ClientRectangle, Color.Red, Color.Blue, LinearGradientMode.Horizontal)

e.Graphics.FillRectangle(lgb, Me.ClientRectangle)

End
Using


Table 2: Dynamic table with layout and auto fit to window turned on

Code

Using lgb As
New LinearGradientBrush(Me.ClientRectangle, Color.Red, Color.Blue, LinearGradientMode.Horizontal)

e.Graphics.FillRectangle(lgb, Me.ClientRectangle)

End
Using


Table 3: Dynamic table with layout and column width set to 100%

Code

Using lgb As
New LinearGradientBrush(Me.ClientRectangle, Color.Red, Color.Blue, LinearGradientMode.Horizontal)

e.Graphics.FillRectangle(lgb, Me.ClientRectangle)

End
Using


Okay, let's see the result now.

Thursday, April 26, 2007

Linear Gradient Brush


Linear gradient brush is a one directional color transition between start and end colors. You can set the transition direction with specify it from start and finish point, or choose the direction from its constructor. To use a linear gradient, simply declare a variable as LinearGradientBrush object. Next step is to calculate transition direction. LinearGradientBrush constructor can receive either graphics object or coordinates. The difference is only that you only can choose 4 default direction if you use a graphics object. Once you're done, prepare its drawing surface. The drawing surface can be ellipse, rectangle, path, region, or even a single line. And one more thing, each of the code shown below is on a form's paint event, unless I've said otherwise.


Part I: Basic Understanding


For starter, let's create a simple rectangle and paint with our first gradient.


Example 1: Drawing a simple linear gradient.


Code


Using lgb As New LinearGradientBrush(Me.ClientRectangle, Color.Red, Color.Blue, LinearGradientMode.Horizontal)


e.Graphics.FillRectangle(lgb, Me.ClientRectangle)


End Using


The code above is using a constructor with rectangle and 2 colors and a defined direction for transition.


From now on, when drawing a GDI+, you should now the difference between brush surface and drawing surface. Let see again at the sample above. Me.ClientRectangle on LinearGradientBrush constructor is the brush surface, while Me.ClientRectangle on FillRectangle method is drawing surface. To make it more clearly, let's take a look on this sample.


Example 2: Drawing 2 linear gradients in different drawing surface


Code


Dim drawingSurface1 As New Rectangle(10, 10, 100, 30)


Dim rectangleBrush1 As New Rectangle(10, 10, 100, 30)


Using lgb As New LinearGradientBrush(rectangleBrush1, Color.Blue, Color.Red, LinearGradientMode.Horizontal)


e.Graphics.FillRectangle(lgb, drawingSurface1)


End Using


Dim drawingSurface2 As New Rectangle(10, 50, 100, 30)
Dim rectangleBrush2 As New Rectangle(10, 50, 150, 30)


Using lgb2 As New LinearGradientBrush(rectangleBrush2, Color.Blue, Color.Red, LinearGradientMode.Horizontal)


e.Graphics.FillRectangle(lgb2, drawingSurface2)


End Using


Recognize the different between first rectangle and second one? On the second rectangle, the gradient actually ends after 150 pixel, but since we only draw 100 pixel with a rectangle, the rest is cut out. So, be creative with your design.


Part II: Triangular Blend


The triangular effect set color transition from a start color to end color and then revert to start color again.


Example 3: Triangular Blend Effect.


Code


Using lgb As New LinearGradientBrush(Me.ClientRectangle, Color.Blue, Color.Red, LinearGradientMode.Horizontal


lgb.SetBlendTriangularShape(0.5F, 1.0F)


e.Graphics.FillRectangle(lgb, Me.ClientRectangle)
End Using


Experiment the peak location by changing the SetBlendTriangularShape value (must be decimal data type).


Part IV: SigmaBell Blend Effect


Just like Triangular Effect, besides that the color transition appears to be more smooth.


Example 4: SigmaBell Blend Effect.


Code


Using lgb As New LinearGradientBrush(Me.ClientRectangle, Color.Blue, Color.Red, LinearGradientMode.Horizontal)


lgb.SetSigmaBellShape(0.5F, 1.0F)


e.Graphics.FillRectangle(lgb, Me.ClientRectangle)


End Using


Part V: Color Blend


My first introduction of this article was "Linear gradient brush is a one directional color transition between start and end colors". So, how many colors can be involved in this effect? No, not just 2 color. It could be many. How come we can involve many colors while the constructor only receives 2 colors? This question answered by using ColorBlend object.


Example 5: Rainbow from Color Blend


Code


Using lgb As New LinearGradientBrush(Me.ClientRectangle, Color.Black, Color.Black, LinearGradientMode.Horizontal)


Dim cb As New ColorBlend(6)
Dim f As Decimal = 0.0F


cb.Colors = New Color() {Color.Red, Color.Orange, Color.Yellow, Color.Green, Color.Blue, Color.Violet}


For i As Integer = 0 To 5
cb.Positions(i) = i / 5
Next


lgb.InterpolationColors = cb
e.Graphics.FillRectangle(lgb, Me.ClientRectangle)
End Using


Part VI: Conclusion


Applying Linear Gradient Brush is not difficult that you can imagine. The problem only defining coordinates and position of the transition colors. Once you can handle it, the rest should be easy.


Happy programming.

Wednesday, April 25, 2007

Gradient Colors in GDI+

In programming, gradient is a transition color from a start point to end point. In my past with VB6, I have to modify each pixel to make a gradient within a container. Now with VB2005, you can make a gradient on a surface with a few lines of codes.

To creating a gradient, we need GradientBrush object. There are 2 types of them: LinearGradientBrush and PathGradientBrush. I'll explain those two in next section.

The LinearGradientBrush

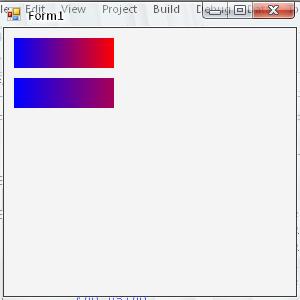
As it names, this method creates a linear gradient color, which means creates 1 way directional gradient. The directional depends on where do you set starting and destination point. There are 4 default destinations for this method which are: Horizontal, Vertical, Diagonal Forward, and Diagonal Backward.

Example:
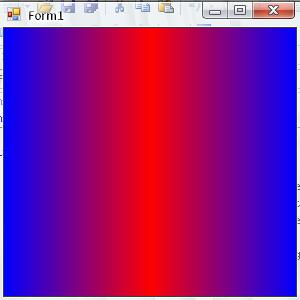
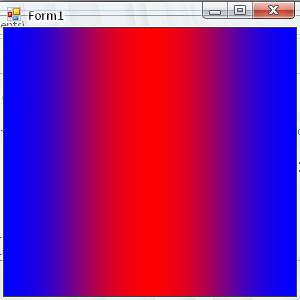
Linear Gradient with Horizontal direction, from Red to Blue and fill entire form.


Code

Using lgb As New LinearGradientBrush(Me.ClientRectangle, Color.Red, Color.Blue, LinearGradientMode.Horizontal)

e.Graphics.FillRectangle(lgb, Me.ClientRectangle)

End Using


The PathGradientBrush

Unlike LinearGradientBrush, the PathGradientBrush method has different way to call. First, it needs a GraphicsPath object.

GraphicsPath may be composed of any number of figures (subpaths). Each figure is either composed of a sequence of connected lines and curves or a geometric shape primitive. The starting point of a figure is the first point in the sequence of connected lines and curves. The ending point is the last point in the sequence. The starting and ending points of a geometric shape primitive are defined by the primitive specification. (Source: MSDN Library, December 2006)

The PathGradientBrush color transition is different from LinearGradientBrush. It focused on a center and spread to the edges of GraphicsPath. If you want to modifiy the center coordinate, use CenterPoint property. Another important property is FocusScale, which determine how strong the transition from starting color to destination color. Also, PathGradientBrush allow you to make multiple color transition in one surface.

Example:
Path Gradient with Red as center color and 3 colors (Blue,Yellow and Green) as surround colors.


Code

Using pth As New GraphicsPath

pth.AddRectangle(Me.ClientRectangle)

Using pgb As New PathGradientBrush(pth)

pgb.CenterColor = Color.Red
pgb.SurroundColors = New Color() {Color.Blue, Color.Yellow, Color.Green}

e.Graphics.FillPath(pgb, pth)
End Using
End Using

Monday, April 23, 2007

Colors in GDI+

One of my most favorite for creating component is playing with colors. With colors, we can create fancy controls for our application and present an "eye candy" application for the user. In this articles, you will find a way to playing with color from using simple basic color to creating advanced gradient color.

Part I: The Brush Object

To make a color, we need a Brush object from Graphics. There are 4 type of brush:

  1. Solid Brush : A plain color
  2. Hatch Brush : A color with hatch effect
  3. Texture Brush : A texture filled object
  4. Gradient Brush : A gradient color brush

Part II: Simple brush

To apply a color to your drawing, you need a graphic object to draw. It can be a pen or a shape.

Ex:


GDI+ has so many objects for displaying. They are:

  • Ellipses
  • Rectangles
  • Arcs (Arc is a portion of ellipse)
  • Beziers
  • Curves
  • Region
  • Path
  • Etc.

Conclusion

GDI+ is a good way for creating nice application UI, components or controls. With learning frequently, you can create any component you want. Your only limit is your creativity. In next section, I'll explain more complex way for manipulating colors using gradients.

Introduction to GDI+

GDI+ is a managed class from .NET Framework that provides function for drawing two-dimensional vector graphics, imaging, and typography. GDI stands for Graphical Device Interfaces and include in earlier Windows platform. GDI+ itself is the portion of Windows XP operating system and adding new features and optimized existing features.

GDI+ is one of most important things that you need to know when you're developing Windows Forms Application in .NET Framework, especially when you want to design a rich UI application, creating a customized component or user controls.

The Basics

GDI+ contains of 3 sections which are:

  1. Vector graphics (Lines, Curves and Shapes)
  2. Images, Bitmaps and Metafiles
  3. Coordinates and Transformations

    Note to Visual Basic 6.0 Users: You probably mentioned why there are no Line and Shape in toolbox area. That's because .NET Framework has replaced them with GDI+ function. You have to use GDI+ to drawing line and shape within the code.

GDI+ is a set of calls or procedure. So, in order to use it, you have to call those functions and passing the required parameters. Since you call a function, its effect can only be seen on runtime mode. You can't see them in design mode unlike VB6. Because you can't see anything in design mode, you have to input parameter and placed the coordinates precisely. That's a bit hard at start, but once you've mastered it, it will become very fun to use.

Using GDI+

To use GDI+, you will need Graphics object. Graphics is a managed interface for providing GDI+ functions. GDI+ class contains of these namespace:

  • System.Drawing
  • System.Drawing.Drawing2D
  • System.Drawing.Imaging
  • System.Drawing.Text
  • System.Drawing.Printing

For using them, there are 2 ways which are: Object.CreateGraphics, or in the Paint event. The Paint event is consider a safer way to using graphics, since the graphics object itself consume a big memory resource, especially if you work wit a lot graphics object. Besides, my articles will mostly use Paint event as well.

Openings

Welcome to Visual Basic 2005 Corner.

In this site, you will find articles about Visual Basic 2005. The topic can be vary from programming, .NET technology review, Tip and tricks and so on. The main reason for me to create this site is because I want to share my knowledge with others, especially who is work with Visual Basic 2005.

Finally, I hope you can find something usefull in this site and you can improved your skills after read articles in this site. Happy reading.

Regards

Michael Rawi