Wednesday, November 7, 2007

Generating Windows Standard Time zones

A time zone, is a region of the earth that has the same standard time. All areas within that region will apply the same time. Because earth sphere shape, and the rotation of the earth, generally there are 24 regions with each region has a difference of 1 hour. But some occasions appeared in some areas resulting it has different time from it region should have.

Windows Time Zone

If you set your time, you will see a time zone tab in the dialog. Alternatively, you can see windows standard time zones in regional setting in control panel. In that dialog, you'll see a list of standard time zones. Our primary goal in this article, is to retrieve the values and mimic it's functionality. And since I'm not lived in Daylight Saving countries, I'll skip that feature because I'm still don't know exactly how it work.

Preparation

Our first preparation is to know where Windows store this time zone list. It stored on registry, at "SOFTWARE\Microsoft\Windows NT\CurrentVersion\Time Zones\". In that key, there are many sub keys which provide information on each time zones. So, to retrieve the time zone list, we will look at these sub keys and read their values.

Designing Basic Fundamentals

The first time we should do is creating a Time Zone structure that will contain time zone data. We don't need a class because it's only for displaying data and light processing. Besides, we will use generic collection to store all time zones structure.

Code
Private Structure TimeZones
Private _Display As String
Private _Name As String
Private _TimeSpan As TimeSpan

Public Property DisplayName() As String
Get
Return _Display
End Get
Set(ByVal value As String)
_Display
= value
End Set
End Property

Public Property Name() As String
Get
Return _Name
End Get
Set(ByVal value As String)
_Name
= value
End Set
End Property

Public ReadOnly Property Span() As TimeSpan
Get
Return _TimeSpan
End Get
End Property
End Structure

Next, we will analyze how time zone structures in registry where windows stored them. As I told earlier, windows stored time zone data in "SOFTWARE\Microsoft\Windows NT\CurrentVersion\Time Zones\". Each time zone data stored on a sub key. In sub key, there are 4 string values, a dword values and a binary values. Basically, we need only one key which is display values. The display key will be added in our time zone structures. From this display data, we will set time span for the time zone as well. To validate a time zone's time span, we will parse directly from display value. Display value will have data like this : "(GMT+07:00) Bangkok, Hanoi, Jakarta". In order to get time span, we will parse "(GMT+07:00)" in order to get 07:00 value. A new function will needed to parse this information, so we add it in Time Zone structure.


Code

Private Sub ValidateTimeSpan()
'Example: (GMT+07:00)
Try
Select Case Mid(_Display, 5, 1)
Case ")" 'GMT
_TimeSpan = New TimeSpan(0, 0, 0)
Case "+"
_TimeSpan
= New TimeSpan(CInt(Mid _
(_Display,
6, 2)), CInt(Mid(_Display, 9, 2)), 0)
Case "-"
_TimeSpan
= New TimeSpan(CInt(Mid_
(_Display,
6, 2)) * -1, CInt(Mid(_Display, 9, 2)) * -1, 0)
End Select
Catch ex As Exception
'GMT will raise an error. So we place it here.
_TimeSpan = New TimeSpan(0, 0, 0)
End Try
End Sub

Now our base structure is ready to use. It's time to implement it in our class. For this sample, I'll use a form and a combo box for generate time zones.


First step is to initialize a collection variable that contain time zones. Next we will fill the collection to our list from windows registry. To access registry, we will need Win32 library.


Code

Private c As New _
System.Collections.Generic.List(
Of TimeZones)

Private Sub GenerateTimezone()
Dim rk As RegistryKey = _
Registry.LocalMachine.OpenSubKey( _
"SOFTWARE\" & _
"Microsoft\Windows NT\" & _
"CurrentVersion\Time Zones\", _
True)

For Each sName As String In _
rk.GetSubKeyNames

Dim tempKey As _
RegistryKey
= _
rk.OpenSubKey(sName,
True)

Dim _tz As New TimeZones
_tz.DisplayName
= _

CType(tempKey.GetValue(_
"Display"), String)

_tz.Name
= _
CType(tempKey.GetValue("Std"), String)

c.Add(_tz)
Next
End Sub

Now we have our list fill with Time Zones information. Unfortunately, the list is not ordered like it should have. Also, time zone ordering is not based on alphabetical. It ordered by time span. Since standard collection class doesn't provide us with that kind of sorting, we have to make by our self.


Code

Private Function TimeZoneConvert(ByVal str As String) _
As String
If Mid(str, 5, 1) = ")" Then
Return "0"
Else
Return Mid(str, 5, 3) & Mid(str, 9, 2)
End If
End Function

Private Function CompareTimezones(_
ByVal tz1 As TimeZones, _
ByVal tz2 As TimeZones) As Integer
If IsNothing(tz1) Then
If IsNothing(tz2) Then
Return 0
Else
Return -1
End If
Else
If IsNothing(tz2) Then
Return 1
Else
Dim int1 As Integer = _
CInt(TimeZoneConvert(tz1.DisplayName))

Dim int2 As Integer = _
CInt(TimeZoneConvert(tz2.DisplayName))

If int1 > int2 Then
Return 1
ElseIf int1 < int2 Then
Return -1
Else
Return 0
End If
End If
End If
End Function

Private Sub DisplayTimeZones()
cmbTimezone.Items.Clear()

c.Sort(
AddressOf CompareTimezones)

For Each tz As TimeZones In c
cmbTimezone.Items.Add(tz.DisplayName)
If TimeZone.CurrentTimeZone.StandardName = _
tz.Name
Then
cmbTimezone.Text
= tz.DisplayName
End If
Next
End Sub

That's all. Our Time Zone form is finished. The form will look like this.


Now, it can display as Windows Time Zone does. You can download the source sample here.
Friday, October 26, 2007

Playing with Visual Studio 2008 Beta 2

It's been 2 weeks since I installed Visual Studio 2008 Team System Beta 2. But I've only play with this new "toy" since last week. Also this is my second time playing with Team Edition of Visual Studio. I have tried Visual Studio 2005 Team System few months ago, but only for a short time.

My first look of this tools is that the user interface has few changes. The first one is the start page news panes has a little change from the previous version. It's tab has slight change too. Also the toolbox tab and task tab has a slight change in appearance.

My most excitement using this tools, because of its Team System version. I never had a change to play with it, since the software price is high for me to afford, and it seems impossible for my company to buy this software at this moment. The one that I want to try is "code metric" future, and Test project. I've also tried Code Analysis feature, which I still not find useful enough right now.

One of my home little project that I work with this tools is to create a global GDI+ functions and methods that I'd like to use in my future projects. I'm tired of making the same GDI+ functions for each project, even if those are new functions. So I want to shorten my work, by grouping all stuff that I'd need in one library. Seems pretty neat isn't it? With this project, I'd like to explore more about Team System Edition and also the new .NET 3.5 features.

Back to the IDE, finally, VB has improved in its intellisense. Now, it works as C# does. You only need to type a word, then intellisense appeared immediately. Actually, I hope Microsoft would give this feature when they shipped VS 2005 Service Pack 1.

The New Project dialog also has a new appearance. You can target a specific .NET Framework version on your project, although I always choose the newest one. New item dialog has improvement too. Now, items divided in groups. You can view them in groups or view them all.

The menu has different highlighting. I bet they manually draw the renderer. The context menu is the same as well.

There's a new addition in project properties. One that I found just as I read this blog, is UAC settings. I bet this has something to do with Windows Vista UAC. I'll explore more about it when I have spare time in my home (since my office don't have Vista and probably don't want to use it in next few years). Framework targeting can be change here, but it require you to close the solution first.

Closing

There's only 4 months until Visual Studio 2008 RTM-ed. So, I guess, it'd be impossible to explore all new stuff. For now, I'll stay in learning how to use Test project. I hope it can go well and I can finish my current home project as well.

Convert Number (Currency) to Word - Part II

On my previous post, I explained how to convert number to word in English language. In this part, I'll explain about Indonesian language.

Basically, there's no big difference between those two languages. In fact, converting to Indonesian is easier than English, because pronunciation rule for Indonesian language is simpler.

There's no change in prefix, except you change English to Indonesian. Single word converter is as easy as prefix. All you have to do is to change their language. Indonesian only have 1 special field for "1" ("Se"), all others will remain same when added a prefix.

The last part is the main function, which is relatively easy too. You only need to add "puluh" and "belas" prefix if needed. The rest can be understand by looking at the code.

You can download the code here. It supports both Indonesian and English .

Thursday, October 25, 2007

Convert Number (Currency) to Word - Part I

On many accounting software, sometimes you need to convert the current number to words. This can be done by make a function which will return a string of number given by input parameter. The function itself actually is very easy to make, if you want basic converting of course. The interesting part is that each developer has unique way to make this algorithm. And because it's wide solution that can be produced, this problem often used by programming courses to make their students understand about algorithm.

To make a good number to word converter, first we must understand how to pronounce those words. In this part, we will make an English converter. Part II will have an Indonesian converter.

Basic Understanding

First rule of converting number is to know the prefix. In English, the common prefixes are hundred, thousand, million, billion, and trillion. I called these by "level". So, we need 5 type of level, right ? Well, not quite right. Actually, we only need 4 type of level. Hundred can be repeated in every level. Ex: 1100 (One thousand one hundred), and 1000100 (One Million One hundred). Now, let's make a function for this level.

Code 1
Private Shared Function EnglishLevel(ByVal level As String) As String
Dim retval As String = ""

Select Case level
Case 0
retval
= "thousand "
Case 1
retval
= "million "
Case 2
retval
= "billion "
Case 3
retval
= "trillion "
End Select

Return retval
End Function

Now me will create a default number to word function. This function will return a string represent the number given in it's parameter. You can see the snippet in code 2.


Code 2

Private Shared Function EnglishNumber(ByVal num As String) As String
Dim retval As String = ""

Select Case num
Case 1
retval
= "one"
Case 2
retval
= "two"
Case 3
retval
= "three"
Case 4
retval
= "four"
Case 5
retval
= "five"
Case 6
retval
= "six"
Case 7
retval
= "seven"
Case 8
retval
= "eight"
Case 9
retval
= "nine"
End Select

Return retval
End Function

Pattern Understanding


Before we make the main function, we should think about the pattern algorithm first and design the function. In this section, I'll explain about how the algorithm works.


The first pattern that you should know, is that within the prefix, the word is repeat them self. Lets see this example: 123,123 (One hundred twenty three thousand one hundred twenty three). Even for 123,123,123; the pattern will be same. All you have to add is only the prefix. By analyze this pattern, we only need a function to define the prefix (which I already add in above), and a function to define the number, and repeat itself. For my solution, I'll use a recursion and playing with reference passing and default math functions.


The second and third patterns are "ty" and "teen" prefix. Some numbers don't change their pronunciations ("sixty"/"sixteen", "seventy"/"seventeen"), but some does change ("fifty"/"fifteen" not "fivety"/"fiveteen"). Luckily, some of those numbers won't have a specific word between "ty" and "teen". Three exceptions are for 10, 11, and 12. Therefore, we should modify our EnglishNumber function from Code 2 in to this.


Code 2 - Revised.

Private Shared Function EnglishNumber(ByVal num As String, _
ByVal special As Boolean) As String
Dim retval As String = ""

Select Case num
Case 1
retval
= "one"
Case 2
If special Then
retval
= "twen"
Else
retval
= "two"
End If
Case 3
If special Then
retval
= "thir"
Else
retval
= "three"
End If
Case 4
retval
= "four"
Case 5
If special Then
retval
= "fif"
Else
retval
= "five"
End If
Case 6
retval
= "six"
Case 7
retval
= "seven"
Case 8
If special Then
retval
= "eigh"
Else
retval
= "eight"
End If
Case 9
retval
= "nine"
End Select

Return retval
End Function

Make Main Function


Finally, all we need is the main function that will be called. Remember that we only need to parse 3 number each prefix, since it will repeat after a prefix was given. For this method, I'll use a recursive approach.


First, we separate hundreds with "\". Second, we will decide whether we need "ty" or "teen". The last one, we will use recursive until we have 3 digits of number.


Additional function that we should add, is the ability to say in either formal English (UK) or non formal English (US). The difference is only the use of "and". In UK, 110 should read "One hundred and ten", while in US, it's ok if you only say "One hundred ten". You can see the code 3 below.


Code 3


Public Shared Function NumberToEnglishWords(ByVal num As Long, _
ByVal level As Integer, _
Optional ByVal Official As _
Boolean = True) As String
Dim retval As String = ""

Dim pInt As Long = num Mod 1000

If pInt > 99 Then
retval
= retval & EnglishNumber(pInt \ 100, False) & " hundred "
End If

pInt
= pInt Mod 100

If pInt > 0 And num \ 100 > 0 And Official = True Then
retval
= retval & "and "
End If

If pInt > 19 Then
retval
= retval & EnglishNumber(pInt \ 10, True) & "ty " & _
EnglishNumber(pInt
Mod 10, False)
ElseIf pInt = 10 Then
retval
= retval & "ten"
ElseIf pInt = 11 Then
retval
= retval & "eleven "
ElseIf pInt > 11 Then
retval
= retval & EnglishNumber(pInt Mod 10, True) & "teen "
ElseIf pInt = 12 Then
retval
= retval & "twelve "
Else
retval
= retval & EnglishNumber(pInt Mod 10, False)
End If

If num \ 1000 > 0 Then
If num \ 1000 Mod 1000 > 0 Then
retval
= NumberToEnglishWords(num \ 1000, level + 1) & " " & _
EnglishLevel(level)
& retval
Else
retval
= NumberToEnglishWords(num \ 1000, level + 1) & retval
End If
End If

Return retval
End Function

That's all. Just call the main function, and it will return the number in string variable. Next part, I'll explain about how to convert number to word in Indonesian Language.


You can download the code here.

Friday, April 27, 2007

Tables from Office 2007 to BlogSpot – Part III

Back to result from my previous post here, and here, I'm disappointed from the results I get (Yeah, all of them). My first curious is because the table width are simply not dynamic. Let's try this again.

Table 1: Dynamic table with layout and auto fit content turned on

Code

Using lgb As
New LinearGradientBrush(Me.ClientRectangle, Color.Red, Color.Blue, LinearGradientMode.Horizontal)

e.Graphics.FillRectangle(lgb, Me.ClientRectangle)

End
Using


Table 2: Dynamic table with layout and auto fit to window turned on

Code

Using lgb As
New LinearGradientBrush(Me.ClientRectangle, Color.Red, Color.Blue, LinearGradientMode.Horizontal)

e.Graphics.FillRectangle(lgb, Me.ClientRectangle)

End
Using


Table 3: Dynamic table with layout and column width set to 100%

Code

Using lgb As
New LinearGradientBrush(Me.ClientRectangle, Color.Red, Color.Blue, LinearGradientMode.Horizontal)

e.Graphics.FillRectangle(lgb, Me.ClientRectangle)

End
Using


Okay, let's see the result now.

Thursday, April 26, 2007

Linear Gradient Brush


Linear gradient brush is a one directional color transition between start and end colors. You can set the transition direction with specify it from start and finish point, or choose the direction from its constructor. To use a linear gradient, simply declare a variable as LinearGradientBrush object. Next step is to calculate transition direction. LinearGradientBrush constructor can receive either graphics object or coordinates. The difference is only that you only can choose 4 default direction if you use a graphics object. Once you're done, prepare its drawing surface. The drawing surface can be ellipse, rectangle, path, region, or even a single line. And one more thing, each of the code shown below is on a form's paint event, unless I've said otherwise.


Part I: Basic Understanding


For starter, let's create a simple rectangle and paint with our first gradient.


Example 1: Drawing a simple linear gradient.


Code


Using lgb As New LinearGradientBrush(Me.ClientRectangle, Color.Red, Color.Blue, LinearGradientMode.Horizontal)


e.Graphics.FillRectangle(lgb, Me.ClientRectangle)


End Using


The code above is using a constructor with rectangle and 2 colors and a defined direction for transition.


From now on, when drawing a GDI+, you should now the difference between brush surface and drawing surface. Let see again at the sample above. Me.ClientRectangle on LinearGradientBrush constructor is the brush surface, while Me.ClientRectangle on FillRectangle method is drawing surface. To make it more clearly, let's take a look on this sample.


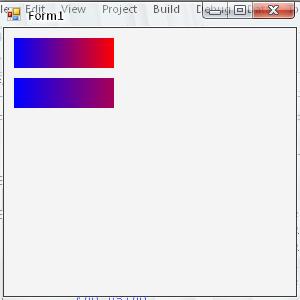
Example 2: Drawing 2 linear gradients in different drawing surface


Code


Dim drawingSurface1 As New Rectangle(10, 10, 100, 30)


Dim rectangleBrush1 As New Rectangle(10, 10, 100, 30)


Using lgb As New LinearGradientBrush(rectangleBrush1, Color.Blue, Color.Red, LinearGradientMode.Horizontal)


e.Graphics.FillRectangle(lgb, drawingSurface1)


End Using


Dim drawingSurface2 As New Rectangle(10, 50, 100, 30)
Dim rectangleBrush2 As New Rectangle(10, 50, 150, 30)


Using lgb2 As New LinearGradientBrush(rectangleBrush2, Color.Blue, Color.Red, LinearGradientMode.Horizontal)


e.Graphics.FillRectangle(lgb2, drawingSurface2)


End Using


Recognize the different between first rectangle and second one? On the second rectangle, the gradient actually ends after 150 pixel, but since we only draw 100 pixel with a rectangle, the rest is cut out. So, be creative with your design.


Part II: Triangular Blend


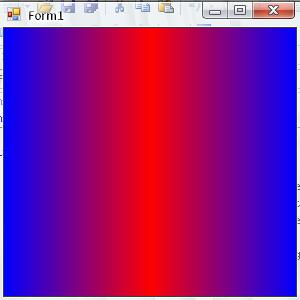
The triangular effect set color transition from a start color to end color and then revert to start color again.


Example 3: Triangular Blend Effect.


Code


Using lgb As New LinearGradientBrush(Me.ClientRectangle, Color.Blue, Color.Red, LinearGradientMode.Horizontal


lgb.SetBlendTriangularShape(0.5F, 1.0F)


e.Graphics.FillRectangle(lgb, Me.ClientRectangle)
End Using


Experiment the peak location by changing the SetBlendTriangularShape value (must be decimal data type).


Part IV: SigmaBell Blend Effect


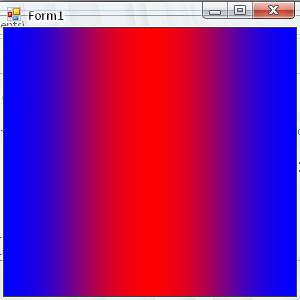
Just like Triangular Effect, besides that the color transition appears to be more smooth.


Example 4: SigmaBell Blend Effect.


Code


Using lgb As New LinearGradientBrush(Me.ClientRectangle, Color.Blue, Color.Red, LinearGradientMode.Horizontal)


lgb.SetSigmaBellShape(0.5F, 1.0F)


e.Graphics.FillRectangle(lgb, Me.ClientRectangle)


End Using


Part V: Color Blend


My first introduction of this article was "Linear gradient brush is a one directional color transition between start and end colors". So, how many colors can be involved in this effect? No, not just 2 color. It could be many. How come we can involve many colors while the constructor only receives 2 colors? This question answered by using ColorBlend object.


Example 5: Rainbow from Color Blend


Code


Using lgb As New LinearGradientBrush(Me.ClientRectangle, Color.Black, Color.Black, LinearGradientMode.Horizontal)


Dim cb As New ColorBlend(6)
Dim f As Decimal = 0.0F


cb.Colors = New Color() {Color.Red, Color.Orange, Color.Yellow, Color.Green, Color.Blue, Color.Violet}


For i As Integer = 0 To 5
cb.Positions(i) = i / 5
Next


lgb.InterpolationColors = cb
e.Graphics.FillRectangle(lgb, Me.ClientRectangle)
End Using


Part VI: Conclusion


Applying Linear Gradient Brush is not difficult that you can imagine. The problem only defining coordinates and position of the transition colors. Once you can handle it, the rest should be easy.


Happy programming.

Wednesday, April 25, 2007

Gradient Colors in GDI+

In programming, gradient is a transition color from a start point to end point. In my past with VB6, I have to modify each pixel to make a gradient within a container. Now with VB2005, you can make a gradient on a surface with a few lines of codes.

To creating a gradient, we need GradientBrush object. There are 2 types of them: LinearGradientBrush and PathGradientBrush. I'll explain those two in next section.

The LinearGradientBrush

As it names, this method creates a linear gradient color, which means creates 1 way directional gradient. The directional depends on where do you set starting and destination point. There are 4 default destinations for this method which are: Horizontal, Vertical, Diagonal Forward, and Diagonal Backward.

Example:
Linear Gradient with Horizontal direction, from Red to Blue and fill entire form.


Code

Using lgb As New LinearGradientBrush(Me.ClientRectangle, Color.Red, Color.Blue, LinearGradientMode.Horizontal)

e.Graphics.FillRectangle(lgb, Me.ClientRectangle)

End Using


The PathGradientBrush

Unlike LinearGradientBrush, the PathGradientBrush method has different way to call. First, it needs a GraphicsPath object.

GraphicsPath may be composed of any number of figures (subpaths). Each figure is either composed of a sequence of connected lines and curves or a geometric shape primitive. The starting point of a figure is the first point in the sequence of connected lines and curves. The ending point is the last point in the sequence. The starting and ending points of a geometric shape primitive are defined by the primitive specification. (Source: MSDN Library, December 2006)

The PathGradientBrush color transition is different from LinearGradientBrush. It focused on a center and spread to the edges of GraphicsPath. If you want to modifiy the center coordinate, use CenterPoint property. Another important property is FocusScale, which determine how strong the transition from starting color to destination color. Also, PathGradientBrush allow you to make multiple color transition in one surface.

Example:
Path Gradient with Red as center color and 3 colors (Blue,Yellow and Green) as surround colors.


Code

Using pth As New GraphicsPath

pth.AddRectangle(Me.ClientRectangle)

Using pgb As New PathGradientBrush(pth)

pgb.CenterColor = Color.Red
pgb.SurroundColors = New Color() {Color.Blue, Color.Yellow, Color.Green}

e.Graphics.FillPath(pgb, pth)
End Using
End Using

Monday, April 23, 2007

Colors in GDI+

One of my most favorite for creating component is playing with colors. With colors, we can create fancy controls for our application and present an "eye candy" application for the user. In this articles, you will find a way to playing with color from using simple basic color to creating advanced gradient color.

Part I: The Brush Object

To make a color, we need a Brush object from Graphics. There are 4 type of brush:

  1. Solid Brush : A plain color
  2. Hatch Brush : A color with hatch effect
  3. Texture Brush : A texture filled object
  4. Gradient Brush : A gradient color brush

Part II: Simple brush

To apply a color to your drawing, you need a graphic object to draw. It can be a pen or a shape.

Ex:


GDI+ has so many objects for displaying. They are:

  • Ellipses
  • Rectangles
  • Arcs (Arc is a portion of ellipse)
  • Beziers
  • Curves
  • Region
  • Path
  • Etc.

Conclusion

GDI+ is a good way for creating nice application UI, components or controls. With learning frequently, you can create any component you want. Your only limit is your creativity. In next section, I'll explain more complex way for manipulating colors using gradients.

Introduction to GDI+

GDI+ is a managed class from .NET Framework that provides function for drawing two-dimensional vector graphics, imaging, and typography. GDI stands for Graphical Device Interfaces and include in earlier Windows platform. GDI+ itself is the portion of Windows XP operating system and adding new features and optimized existing features.

GDI+ is one of most important things that you need to know when you're developing Windows Forms Application in .NET Framework, especially when you want to design a rich UI application, creating a customized component or user controls.

The Basics

GDI+ contains of 3 sections which are:

  1. Vector graphics (Lines, Curves and Shapes)
  2. Images, Bitmaps and Metafiles
  3. Coordinates and Transformations

    Note to Visual Basic 6.0 Users: You probably mentioned why there are no Line and Shape in toolbox area. That's because .NET Framework has replaced them with GDI+ function. You have to use GDI+ to drawing line and shape within the code.

GDI+ is a set of calls or procedure. So, in order to use it, you have to call those functions and passing the required parameters. Since you call a function, its effect can only be seen on runtime mode. You can't see them in design mode unlike VB6. Because you can't see anything in design mode, you have to input parameter and placed the coordinates precisely. That's a bit hard at start, but once you've mastered it, it will become very fun to use.

Using GDI+

To use GDI+, you will need Graphics object. Graphics is a managed interface for providing GDI+ functions. GDI+ class contains of these namespace:

  • System.Drawing
  • System.Drawing.Drawing2D
  • System.Drawing.Imaging
  • System.Drawing.Text
  • System.Drawing.Printing

For using them, there are 2 ways which are: Object.CreateGraphics, or in the Paint event. The Paint event is consider a safer way to using graphics, since the graphics object itself consume a big memory resource, especially if you work wit a lot graphics object. Besides, my articles will mostly use Paint event as well.

Openings

Welcome to Visual Basic 2005 Corner.

In this site, you will find articles about Visual Basic 2005. The topic can be vary from programming, .NET technology review, Tip and tricks and so on. The main reason for me to create this site is because I want to share my knowledge with others, especially who is work with Visual Basic 2005.

Finally, I hope you can find something usefull in this site and you can improved your skills after read articles in this site. Happy reading.

Regards

Michael Rawi